Thursday 30 May 2013

Tick, Tock, Where's My Clock? - Class

Hey there,

Here's something I've been holding on to for a while. I'd been waiting for this Tim Holtz assemblage clock (new 2013 release) for ages and it finally arrived at HKMC a few weeks ago. Absolutely in love with all the projects I've seen done with them and when I saw the Graphic45 Secret Garden collection, I knew I wanted to use it with the clock. Can I say how much I love this collection?

 Secret Garden Assemblage Clock
 Beautiful, whimsical clock
 The inside is all fussy cut from the Secret Garden papers and pop-dotted in several staggered layers.
 Added Prima roses and blooms make the garden extra special. The mini lantern is fixed in with the battery on the outside, so you can remove it easily.
 I also added a few gorgeous gossamy flowers to trim the rim of the clock.
 The clock surface was texturized and "aged". I love the little brass bird's next charm hanging off the alarm bell.

I'll be teaching this one at HKMC next month and spaces are very limited, so make sure to book early.

Class Details
Secret Garden Altered Clock Class
Date 25th (Tuesday) June, 2013
Time 7:00 - 10:00pm
Fee HK$550.00

My other class for June is for the Spectrum Noir pens. Spectrum Noir is a recognised brand of alcohol markers, made in the United Kingdom and a favourite among colourists everywhere. In this class, I will be showing you the pen systems, how to match colours, blending and shading techniques and make a card or two at the same time.

 The Spectrum Noir alcohol pen system

 A sample card we will be working on

Sign up for an introduction to this pen system, all attendees will be offering the marker set at a Special Discounted Price of HK$1500 (original price HK$2120) a 72-color set, which includes a DVD, a pack of pen nibs, a pack of stamping paper and a set of storage racks for free.

Class Details
Date 10th (Tuesday) June, 2013
Time 7:00 - 10:00pm

For more details on both classes and ones by our other talented instructors, email info@hkmemorychestonline.com or ring 2559 0175.

Looking forward to seeing you all there,


Flowery Gaming

Hi all,

It's been a while since my last post. I haven't been feeling very creative lately and have spent more time caking rather than crafting (and a bit of gaming too - been hooked on hidden object games lately, since I got my new iPad - the last one broke). It's just too addictive. Good thing I haven't started Candy Crush - I heard that one is unputdownable (I know that's not a word).

The week after Mother's Day, Miss C had a few days off school and hubby's company had a incentive trip, so we tagged along for a mini holiday to Tokyo. I know. We're not spoilt. At all.

 Waiting in the hotel lobby while we check in. That pillow has been on every single trip with us

Since we only had two full days, we spent one of them at Tokyo Disneysea. Yup, "Sea", not "Land". I didn't even know there was such a park, but it's right next to Tokyo Disneyland and features more sea-themed rides and attractions, naturally. This fit in perfectly for Miss C, since she loves Ariel and even got the chance to take a picture with her.  There was also one funny, idiot-parents moment, where we took her up on the Tower of Terror, not knowing it was a free-fall ride. She was NOT happy with us.

Tickled pink by Donald

The second full day was spent shopping and eating. We even went down to Tsujiki Market for fresh sushi. Boy, was Miss C in heaven. She absolutely loves sushi.

 Stack 'em up

As for the shopping, we even got to spend a quick hour at Tokyo Hand, so of course I had to get some more washi tape. Not a lot, but these ones are super cute - love them. I was actually more excited about the Le Creuset dutch oven hubby helped lug back for me - so much cheaper than what I can get for it here. And, it was baby blue! Love it.

The cutest washi. Not sure what I'll use it on but too cute to pass up. 

Anyway, enough about our little sojourn and back to that iPad I mentioned. My old one won't charge up anymore and Apple wants to charge me half the price of a new one to get it fixed. Better to get a new one, I say. So, that was my mother's day gift from the sweet hubs and child. I then went looking for a cover and settled for a plain raw canvas cover with the intent to alter it.

First, randomly brushed gesso over parts of the cover before spraying with peach, orange and yellow mists.
 I then used light modelling paste with a chevron mask and blue acrylic paint on the top and bottom corners with a herringbone mask.
 I then layered on flowers, bling, letters and some wooden arrows I had painted in the same blue paint. I made sure that none of the elements would be squashed or damaged when I folded the cover.
I left the back clean, but I'm still thinking of whether to spray it to match. What do you think?

When doing a project like this, where it will be handled a lot, make sure you use a strong glue and the colours will not rub off. I made sure to add extra glue to letters and bling, even thought they came with its own adhesive backing.

I love how tactile it is. I can't resist running my fingers through the flowers every time I pick up my iPad. I'm not too worried about taking it out as it will be mostly used at home, but it should withstand alot of wear and tear, being stuffed in bags and thrown around.

Products Used
Flowers, glass pebbles, roman numeral metal and chevron mask from Prima Marketing
Herringbone mask from Crafter's Workshop
Crystal flourish bling from Kaisercraft
Foma letters from Amy Tangerine Thickers by American Crafts
Wooden veneer arrows from Studio Calico
Modelling paste from Golden
Sprays in peach, oranges and yellows from various companies
Teal Zircon Silks acrylic glaze by Luminarte
Glossy Accents
Metallic flower, flower cabochons and glass bubble domes sourced locally

Hopefully, we've seen the end of my crafting funk and there will be more projects to post very soon.

Thanks for dropping by,


Friday 10 May 2013

A Little Gift For Mum

Hi there,

As with many other countries, we will be celebrating Mother's Day this coming Sunday here in Hong Kong. I always found that strange, since Hong Kong was a British colony and followed most UK holidays, so it really should be in March or the 4th Sunday in Lent.

Mother's day here usually means packed restaurants and florists selling more carnations in one day, than the whole year put together. My favourite part though is having a nice lie in while Miss C and her daddy fiddle about in the kitchen together, rustling up my breakfast before snuggling in together on the bed.

This year will probably be no different, however, craft-wise, I wanted to concentrate on my own mum. My parents live two floors below us in our building and are really getting on. Dad's not very steady on his feet anymore and Mum has always been the rock for us. She's an amazing lady, been through a lot in her life and does everything with poise and dignity. She's been such a guiding light and I can always hear her voice in everything that I do. Many of my own actions and decisions come rooted from her and my dad and I feel that I have been a better person because of it.

I wanted to show my appreciation this year, with a framed photo gift and card. I've made them with a vintage vibe and I know she'll love this better than any other gift I could purchase.

Framed Vintage Mother's Day Gift
I brushed gesso over a small white Ikea frame, before completely covering it with brown acrylic paint. I then brushed on a layer of Silks paint in Nutmeg, before highlighting in gold arcylic. After it was all dry, I used a piece of fine sandpaper to rub off some of the paint from corners and edges.
A pretty selection of Prima flowers clustered together to form a permanent bouquet.
I've had this butterfly in my stash for the longest time. I added "rubies" to make it pop.

Mother's Day Card
An easy 3.5" x 8" card with ready made embellishments. I backed it with some gorgeous old Pink Paislee paper, before gluing on two different strips of lace.
Prima flowers and some Pink Paislee die-cuts bulk out the card. I also added a cameo to the bottom die-cut and a pink rose cabochon to the small pink flower.

 Hope you all have a wonderful Mother's day,


Wednesday 8 May 2013

Imagination Has No Limits

Finally, a layout. I don't think I've done one since the ones I did for the HKMC May Kit Club. I just had to find time and do one layout, and boy, did I go all out.

You know I love my Prima, so here's one with one of their 2013 releases - Lyric.  I just fell in love with this line (as with the other Prima lines). It's a great mix of romantic, flowers and music notes.

Imagination Know No Limits
Gorgeous Prima Lyric papers and embellishments.
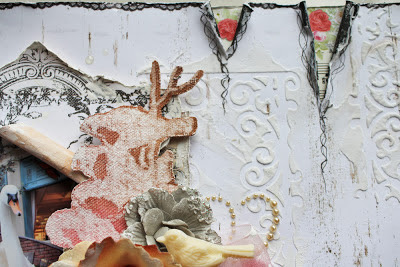
I fussy cut banners with beautiful lace for multi-dimensional layers. The butterflies were spritzed with pinks and oranges. I covered most surfaces with smudges of white crackle paint.
 I used light modelling paste with a Prima mask to create the background. For the ripped edges, I backed them with some of the music/rose paper and also did a bit of doodling. I finished off the layout with Glossy Accent "water droplets".
I cut out one of the frames and ripped/rolled a large hole in the middle to frame the photo. The photo was taken in at the conservatory of the Las Vegas Bellagio hotel. 

Products Used
Papers, chipboard, canvas resist accents, small flowers from Prima Marketing Lyric collection
Medium, large flowers and stencil mask from Prima Marketing 
Rock Candy and Picket Fence crackle paint from Tim Holtz by Ranger
Pearl florish by Kaisercraft
Glossy Accents by Ranger
Glimmer mists and sprays from stash
Doily, resin bird and lace sourced locally

Thanks for stopping by,


Rainbows and Unicorns - Cake

Hi there,

I apologise as it's been a bit slow on the scrapbooking front the last few days. Daily life catching up with you, you know?

I've been able to do one layout this week, so far. Not sure if I'll be able to get another one in as it's more cake orders this weekend.

So, here's one of the cakes from last weekend. One of my favourites - I didn't think I could do the unicorns, but they turned out ok. Not perfect, but I do like the horns. It was for a full rainbow party, so I made some mini rainbow cupcakes as well.

 Little mini vanilla cupcakes look so striking on your party table.
 Unicorns under a rainbow. The whole cake was egg and dairy free chocolate cake.
Sweet shimmery mama and baby unicorns.

My other cake was a New York cheesecake with lots of red fruit on top, but I forgot to take photos of that one.

I'm trying to tidy up my blog, so I'll be doing cake posts separately. That way, I'll be able to classify my post subjects easier as time goes by.  I'll be doing a layout post next

Thanks for looking,


Saturday 4 May 2013

Something A "Little" Different

Hi there,

I know I haven't really posted much in the last two weeks. I think I was a little burnt out after the retreat and just wanted to do other things to recharge my creative batteries. I've also had/have cake orders three weekends in a row. Apparently, May is one busy month for birthdays.

I did two last weekend but only took photos of one of them and regret not taking pics of the second, which was a rainbow cake. So much fun to pipe them.

Tedious but so fun to do scalloped cake.

This Saturday is National Scrapbooking Day, and although it says national, scrapbooking is now universal, so let's call it International Scrapbooking Day. HKMC has been celebrating with give aways, so be sure to drop in at the shop before stocks run out. More details at info@hkmemorychestonline.com or ring 2559 0175.

Shockingly, I haven't had anything prepared to celebrate NSD, although, this week, I've been playing around with Artist Trading Cards. HKMC has set up an ATC wall at the shop and I've wanted to start an ATC club for a while. If you've not heard of artist trading cards, they are 2.5" x 3.5" cards which you can create in any style or with any medium. Little pieces of art, they are usually made in a series, so they can be traded or swapped with other members. It's a great way to show others your work on little cards. Since you would make a number of them, they're kept relatively simple so you don't feel as bad having to give them away. This Wikihow link will probably explain the process better than I can.

Hello Spring ATCs
I did a series of eight cards for my first effort. I love the colours of the flowers popping out from the background and also love the oriental feel to them.
 First, I watered down Scattered Straw and Salty Ocean distress inks on my craft mat, swiped the cards through the colour and heat dried. I then spritzed with water and blotted the excess water with a towel. I then soaked a brush with more diluted Salty Ocean distress ink and splattered it around to create the blue splotches.
 I stamped the images with black archival ink before shading it in with distress markers. The stamens were dotted with Stickles, while the little curls were dotted with liquid pearls. After it was all dry, I then ran the tip of my Glossy Accents bottle around the stamped outlines, creating a raised embossed effect. For the last step, I stamped the Japanese cherry blossom stamp randomly on each card in red archival ink. I got the stamp in Japan at a traditional stamp shop and just love it.
To finish the card, I printed out a description tag to stick to the back of each card. This part is important, so whoever gets your card has a reference to your tiny piece of art.

So there you go. My first attempt. Hope you like it. I'm experimenting with my second lot of cards and hopefully will have more to show you soon. I hope you'll join me in making some ATCs of your own. I would love to see all your creations.

In the meantime, I have two more cakes to finish for this weekend and probably a layout somewhere in between.

Happy Scrapping,


Thursday 2 May 2013

HK Memory Chest Kit Club - May 2013

Hello there,

The weather is heating up over here and summer is just around the corner. To compliment the season, the May kit is all about summer fun. Blue skies, bike rides and lots and lots of ice cream.

May 2013 Kit
2 sheets Carta Bella Cool Summer "Midsummer Sky" papers
2 sheets Carta Bella Cool Summer "One Scoop" papers
2 sheets Carta Bella Cool Summer "Summer Words" papers
2 sheets Carta Bella Cool Summer "Summer Season Cards" papers
1 sheet Carta Bella Cool Summer Alpha Stickers
1 pack Jillibean Soup White Frames
1 pack Little Yellow Bicycle Cling Word "My Happiness" Stamps

Add-On Options
Carta Bella Cool Summer Aqua/Brown Paper
Carta Bella Cool Summer Cloud Cream / Garden Green Cardstock
Jillibean Soup Kool Kraft Corrugated Alphas
Hampton Arts DecoRunner - Cloudy Skies


May/June Combination Sizzix Die
Sizzix Movers & Shapers Die - Pocket Envelope plus one pack of selected embossing folders (2 folder per pack)


Water Fun
 Don't you love the bright summer colours? There's a good mix of blues, greens yellows and pinks to go around. I love the instaframes, which comes in a full sheet of 16.
 There are word stickers and corrugated cardboard stickers, so you can be a bit more creative with your title.
Cut out some of the elements to add more details.

Yum
So much pinkness, so much fun. Makes me want to dive in and take a slurp.
I glittered the clouds here to give that extra shine. I die cut the envelope and turned the flap the other way round to show the other side of the patterned paper.
Cut out some of the ice cream images to add more yumminess to the page.

Extra Elements: Glossy Accents, clear glitter

Other DT Projects

My Happy Place by Angela Collingwood
 Family Time Australia by Angela McDaniel
 Ice Cream Delight by Angela McDaniel
 A Perfect Summer Day by Erika Lui
 Life Is A Bowl Full Of Cherries by Erika Lui

Here are the kit crop times:

Sheung Wan Crop
14th May (Tuesday)
10:30am - 12:30pm
Hosted by Grace Wong

14th May (Tuesday)
7:30pm - 9:30pm
Hosted by Erika Lui

Discovery Bay Crop
9th May (Thursday)
10am - 12pm
Hosted by Angela McDaniel

Looking forward to seeing all the kit club member projects from this kit.

Thanks for dropping by,


You might also like

Related Posts Plugin for WordPress, Blogger...